Due to the Code Your Own (CYO) format, it’s crucial that the person creating this type of campaign is experienced with HTML code because there isn’t any direct support for customer-created code. However, you always have the option to select from the Template Gallery with over 200 beautifully designed templates that you can customize using the drag and drop editor.
In fact, when using the editor, we’ve taken care of things like image padding and mailing margins. But, if you’re using a Code Your Own (CYO) template and are coding your own mailing from scratch, you’ll need to apply widths to your content areas by following these instructions.
How to create padding & margins in HTML
If you neglect to add padding or margins to your layout, your text and images will run into each other:
There are a few ways to write your code so this doesn’t happen. If you’re working at a <td> level, we recommend using style padding, like so:
<td style=”padding:5px;”>
If you’re working within <div> tags, it’s better to use margins like this:
<div style=”margin:5px;”>
However, we don’t recommend using the padding attribute in <div> tags, because they will be stripped from Outlook 2007 and 2010.
Let’s imagine you’d like to pad the above image box, and you want different padding on the right side and on the bottom. This could be done like so:
For padding, try: <td style=”padding-left:0px; padding-top: 0px; padding-right:20px; padding-bottom:10px;”>
For margins, try: <div style=”margin-left:0px; margin-top: 0px; margin-right:20px; margin-bottom:10px;”>
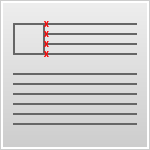
Doing so will turn out like this:

Sample code for a wrapping text box
To achieve the look above, follow these instructions.
1. Using <div> style margins:

2. Using <td> style padding:

How to assign an email width
You don’t want to forget to assign width to your content areas. If you miss this step, your email’s width could vary greatly from email client to email client, based on the amount of content you place in each column.
If you want the columns to be equally weighted, you would assign a column width of 50% to each, like so:

And it turns out looking like this:
![]()