Regardless of the type of email template that you use, once you have finished creating a new campaign and select the Review & send button, the page options are the same for all users. Here, we’ll go over the details on the Review & send page as well as cover how to edit a saved or scheduled campaign once it has been designed.
How to create a new campaign
The rest of the instructions in this article are for post-campaign creation, but if you haven’t already created one, follow these instructions to get started.
- Log in and open the Campaigns section of your account.
- On the Emails page, click the Create new campaign button.
- Select which kind of template you would like, choose from a blank template, code your own, or pick a design from the template gallery.
- Design or customize the campaign to your liking using the drag and drop editor or a CYO template.
- Always be sure to send a test of your campaign before sending it out to the intended audience.
- When you’ve finished working on the content for your campaign and it looks the way you want it to, click the Review & send button.
Review & send page details
Once selected, the Review & send page will open and you can choose which of your contacts the campaign will be sent to, as well as any that should be excluded. This is also where you will add your subject line and preheader text (if desired), select which signup form to add, and schedule a time and date to send the campaign if you don’t want to send it right away. The following sections provide an overview of these options and settings.
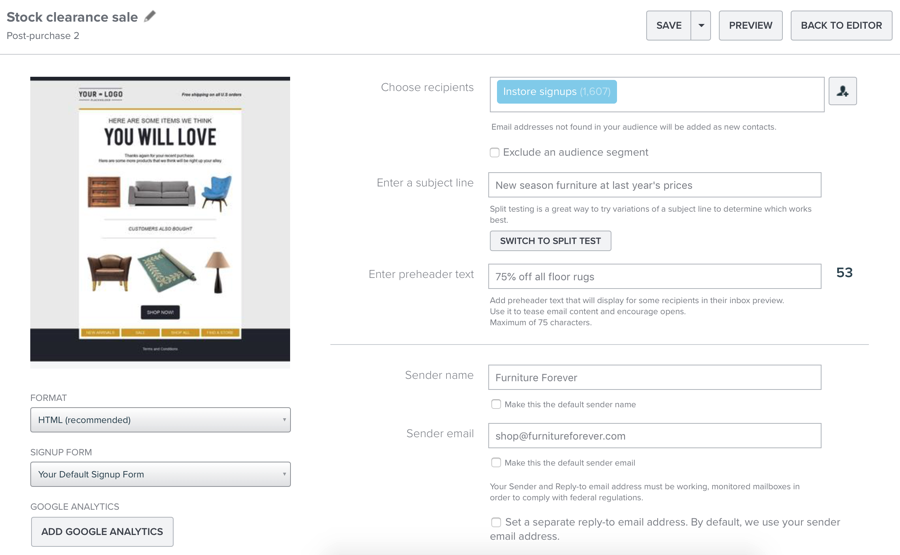
Choose recipients
You can select to send to groups, segments, subscriptions, or individuals. The specified groups, segments, and subscriptions are refreshed at the time of sending to ensure your campaign is sent to the current audience. To add some, either start typing a name into the field, or click the person icon on the right to display your full list of each option.

Exclude recipients
You also have the option to exclude select contacts in your audience by checking the Exclude an audience segment box. This will display a dropdown menu of your existing segments, and allows you to select one segment only. Here are two other aspects to remember about excluding recipients.
- If you need to exclude more than one segment of contacts, we suggest you first create a new segment that combines the criteria of the existing segments.
- After the campaign has been sent, you can refer to your Response page to see which contacts were not included by selecting the Excluded tab.
Subject line
Type in your subject line or check the box next to split test your subject line. Split testing, also known as A/B testing, is a way of working out which of two options is the most effective in terms of encouraging opens and is something we always suggest trying.
You can also add an emoji to your subject line if warranted, but whatever you choose, be sure to keep your character count in mind as subject lines have limited space and are considered to be one of the most important aspects of any email.
Preheader text
Preheader text is a brief description of what’s in your email. It’s not displayed in the email itself, but appears in the email preview of most inboxes, following the subject line.

While the preheader text is not required, if you don’t write anything, inboxes that show this text will pull it from the first line of text in the plaintext version of your mailing, which isn’t always a good look.
Sender and reply-to details
In this area, the name and email address that you have listed as the ‘from’ details for your account will auto load in the fields for the sender name and sender email. You can keep what’s there or enter in new details that may be pertinent to that campaign, or you can also add a unique reply-to address. Additionally, it gives you the option to overwrite these default ‘from’ details for your account and set the updated information as the new default, so be sure if you make this selection that it is what you want for all of your campaigns moving forward.
Select a signup form
If you have more than one signup form, you will see them as options when you click the down arrow under Signup form, regardless, you will need to choose one. The signup form that you select will be what’s included in the Manage your preferences link in the footer of your campaign.

Google Analytics
You will also see a button for Google Analytics that you can select if you would like to connect Google Analytics to the campaign. However, connecting Google Analytics is not required and completely voluntary to add.
Send now or schedule the send time
You can choose to send your campaign right away by clicking the Send now button, or select Schedule for later to choose a send time in the future. The send time is based on the time zone set in your account. (If the time is incorrect it’s a quick fix, just click your name at the top right, then select Account. This will open on the Basics tab where you can change the time zone.)
After you have scheduled a campaign for a future date or time, you can still make edits before the send time arrives. However, it is not possible to stop, recall, or edit a sent email after it has left our servers. For a list of reminders to help prevent mistakes, see our pre-send campaign checklist.
Scheduling notifications
When scheduling your campaign, you will be given the option to be notified once it starts. You can add multiple emails if your team members need to be notified as well. Make your selections and then click the Schedule it! button.

After you select the Schedule it! button or choose to send your campaign, you will see a Head’s Up email, which is just a preview image of the campaign that’s about to start sending and not the email itself. Since this not the actual mailing, your links will not work in the preview image.
How to edit a scheduled campaign
Anytime you’ve scheduled a mailing to send later, you can still make changes to it before it’s sent but you will first have to cancel the send time.
1. Log in and open the Campaigns section of your account.
2. It will open to the Emails page, click the Scheduled tab.
3. Click the down arrow to the right of the scheduled mailing, then select Cancel send. This will move the mailing to your saved drafts.

4. You’ll be brought back to the Emails page, click on the Drafts tab, and then select the email name to open it in the campaign editor.
5. Edit the campaign as you wish, or if you just need to change the scheduled send time, click the Review & send button so you can reset the send time. However, you’ll also need to select your recipients again and reconfirm all other selections on the page.