Ⓘ Available to Teams and Corporate accounts
For tiered accounts with a large number of subaccounts, it can be difficult to stay organized and keep track of all their accounts. To make things easier, we have created subaccount categories for Teams and Corporate accounts. The account Parent and Managers with permission to create subaccounts can create and assign categories and use them to filter the subaccounts that appear on the main Subaccounts menu.
How to create categories
To create subaccount categories, follow these steps:
- If you are in the parent account, click on the Subaccounts section at the top of the page. If you are currently in a subaccount, click on the house icon in the upper right corner of your screen and select Subaccounts from the dropdown menu.
- Click on the Subaccount categories tab.
- Click on the Create a new category button on the right.
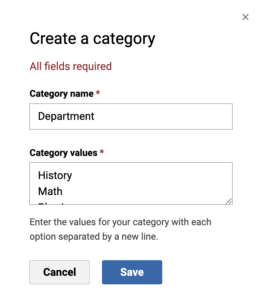
- In the pop-up window that appears:
- In the Category name field, enter a name for the category. For example, “Department”.
- In the Category values field, enter the options within the category, with each option on its own line. For example, for the “Department” category, you might have values for History, Math, Physics, and Literature.
- Click on the Save button.
How to add, edit, or remove values
To add, edit, or remove a value, follow these steps:
- If you are in the parent account, click on the Subaccounts section at the top of the page. If you are currently in a subaccount, click on the house icon in the upper right corner of your screen and select Subaccounts from the dropdown menu.
- Click on the Subaccount categories tab.
- Click on the name of the category whose values you wish to modify.
- On the next page:
- To add a value, click on the Create a new value button, enter the desired value or values, and then click on the Save button.
- To edit a value, click on the dropdown arrow that corresponds to that value and select Rename from the menu.
- To remove a value, click on the dropdown arrow that corresponds to that value and select Delete from the menu.
How to display categories
Once you have created at least one category, you can choose to make that category visible on the main Subaccounts page. To do this, follow these steps:
- If you are in the parent account, click on the Subaccounts section at the top of the page. If you are currently in a subaccount, click on the house icon in the upper right corner of your screen and select Subaccounts from the dropdown menu.
- Click on the Category display button on the right.
- In the pop-up window that appears, check the box next to each category that you’d like displayed
- Click on the Save button.
Once you’ve saved your changes, the grid will update to show a column for each category. In a category’s column, you will see a subaccount’s value within that category. If a subaccount has not been assigned a value for that category, you will see a plus sign icon instead.
How to assign values to subaccounts
You can assign values to subaccounts individually or in bulk.
Assign individually
- Locate the desired subaccount in the grid.
- Click on the plus sign icon in the column that corresponds to the desired category.
- Use the search bar or scroll through the dropdown menu to find the desired value.
- Once you’ve located the appropriate value, simply click on it and the value will be applied.
To edit a subaccount’s value, follow the same steps as above, but instead of clicking on the plus sign icon, you will click on the subaccount’s current value.
Assign in bulk
- Check the box next to each desired subaccount.
- Click on the Bulk assign category button.
- In the pop-up window that appears, click on the dropdown menu and select the desired category.
- Once you’ve selected a category, a new dropdown menu will appear, allowing you to select the desired value.
- Click on the Save button.
How to filter by category
To filter by category or value, simply click on the Filter by category dropdown menu on the upper left of the main Subaccounts grid. Check the box next to each value that you’d like to filter by and the grid will update accordingly.

