This article explains how to create and edit regular / classic signup forms.
In your account, there are two main categories of signup forms: Lightbox forms and regular / classic forms. Lightbox forms are sometimes called pop-up forms. Within the regular / classic form category, there are two different types: forms made with our current form builder and forms made with our legacy form builder. The two types function similarly, but the process of editing them is a little different.
Finding Your Forms
To find your forms, navigate to the Audience tab and click on the Forms section on the left. Once there, you’ll see a list of your current forms. Click on a form name to open it in the builder.
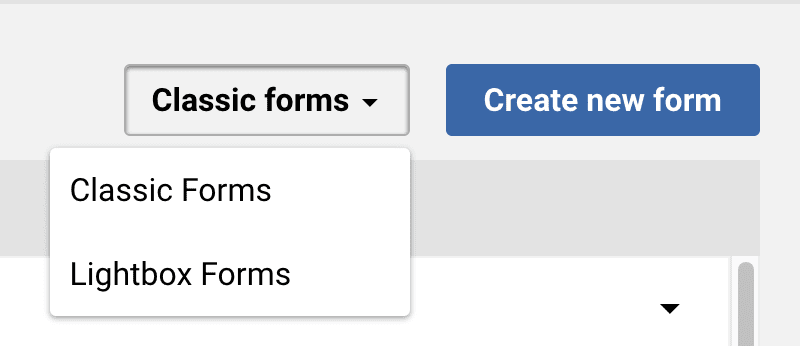
To view your lightbox forms, click the dropdown menu on the right.
The legacy form builder has been sunset, so newer accounts will only have forms created with the current builder. Legacy forms and current forms will be listed under the “Classic forms” section in any accounts that have both.
Current Form Builder
If your screen has a “Cancel” button at the top left, a progress bar in the top center, and two buttons on the top right (“Save and review” and “Next”), like the screenshot below, then the form you clicked on was built in the current form builder.

Legacy Form Builder
If your screen has an “About this signup form” heading at the top left and a single “Save” button at the top right, like the screenshot below, then the form you clicked on was built in the legacy form builder.

Creating a New Form
The legacy form builder has been sunset, so all new forms will automatically open in the current form builder. Follow the steps below to get started building a new form.
Step 1: Select the Form
- Navigate to your Audience tab.
- Click on the Forms section in the panel on the left.
- Click on the Create new form button.
- To build a regular form, type in a form name and click on the Next.
Click on Build a lightbox form to open the lightbox form builder. Click on I just need the API to be redirected to your API Key tab, unless you do not have permission to generate API keys.

After you’ve named your new form and clicked Next, the form builder will open. The current form builder consists of four sections: Settings, Builder, Messages, and Review.

Step 2: Settings
In the Settings section, you can select which groups new subscribers should be added to, whether you would like to receive signup notifications, and if you would like to track any of this activity through Google Analytics. Make your selections and then click on the Next button.
At any time during the process, you can click on the Save and review button to skip to the end.
Note: Starting April 18, 2024, signup forms only support GA4 tracking codes. If you previously had a UA tracking code attached to a signup form, we will leave it intact, but we cannot provide support for it. New entries will only allow GA4 tracking codes.

Step 3: Builder
The Builder screen is where you can really customize your form, so there’s a lot of options. On the right side of the page, there are two sections: Content Options and Security Options. These sections allow you to toggle on / off the form message, form image, email consent, tracking consent, privacy terms, and reCaptcha.
Tip: Adding a reCaptcha to your form can help prevent bot signups, so we encourage you to include one on every form.

In the center of the page is your form preview. Just above the preview section, there’s a computer icon and a phone icon that allow you to switch between desktop and mobile preview modes. At the top of the preview section, you’ll see a text block where you can change the copy, font, color, and style of your form message. If you’ve toggled off the form message, that text block will not appear.
Contact fields are located beneath the form message. By default only Email is included, but you can use the “Add object” button to add more.
Adding a Field
- Click on the Add object button.
- Select Add field from the dropdown menu.
- Click on the radio button next to “Select from your current fields” or “Create a new field”.
- Follow the prompts to select or create your field. If desired, you can also edit the field’s display name.
- Click on the Add field button.

Adding a Subscription
- Click on the Add object button.
- Select Add subscription from the dropdown menu.
- Check the box next to each subscription that you want to include. You can also check the box to display the subscription descriptions.
- Click on the Save button.
Adding subscriptions to your signup forms empowers contacts to decide what content they want to receive from you. By giving new contacts the power to choose which content is most relevant to them, you will build brand trust and reduce the number of people who choose to opt-out completely from your emails.

Note: Checking the “Display on form” box will automatically check the “Add subscribers” box for that subscription. This does not mean that anyone who fills out the form will be added to that subscription. Only contacts who check that subscription’s box will be added to that subscription.
Arranging Fields and Subscriptions
Once you’ve added your fields and subscriptions, you can move them around and reorder them by clicking the dots to an item’s left and dragging it up or down. You can make a field required by hovering your mouse over it and checking the “Required” box; subscriptions cannot be made required. You can remove a field or subscription by hovering your mouse over it and clicking on the X.

Once you’re happy with your form preview, click on the Next button to head to the Messages section.
Step 4: Messages
In the Messages tab, you can create the success message and confirmation emails that subscribers receive after they sign up using the form. You can use the text editor to adjust your success message and there’s also an option you can choose that will take the subscriber to a webpage if you are doing a specific promotion.

There are two types of confirmation emails: the signup confirmation and the manage preferences confirmation. Both types are always sent as plaintext, so it’s not possible to edit their font, color, or style. However, you can edit the copy in the subject line and body of each message and you can use the checkboxes to turn them on or off.

Make your selections and then click on the Next button.
Step 5: Review
The final step is to preview the signup form and review a summary of your options. Click on the Edit button on any area to change the details. Once you are satisfied with your selections, click on the Publish button.
In the pop-up that appears, you will see the various ways you can access your new signup form. You’ll have options to share a link, embed a link, embed on a website, or get the signup ID. Copy the text for your preferred option and click on the Close and exit button to finish.
If you need the link or embed code in the future, you can retrieve it without opening the builder.
- Navigate to your Audience tab.
- Click on the Forms section.
- Locate the desired form in the list.
- Click on the corresponding dropdown arrow.
- Select Add to your site from the list.
A pop-up window will appear with the link, embed code, and signup ID.

Editing an Existing Form
You can edit any existing form by returning to your Forms page and clicking on the form name to open the builder.
Editing a Current Form
When editing a current form, you can use all the tools described in the ‘Creating a New Form’ section above. Once you’re done, you’ll just need to click on the Publish button to see any new edits reflected on a live webpage.
Editing a Legacy Form
Step 1: Form Name, Notifications, and ReCaptcha
In the “About this signup form” section at the top of the page, you’ll see the options to change the “Signup form name”, adjust the “Notification settings”, and “Enable reCaptcha”.

The notification settings allow you to receive an email notification when someone joins your list using the form and gives you the option of adding up to three additional notification recipients. Adding reCaptcha protects your signup form from bot signups, so we recommend adding it to every form. Make the changes you prefer to those fields and then click on the Save button.
Step 2: Form Image, Copy, and Fields
In the “Signup stages” section, there are five tabs: “Signup form”, “Thank you message”, “Confirmation email”, “Tracking”, and “Manage preferences email”.
![]()
The first tab, “Signup form”, is where you’ll edit the form itself. At the top you can add an image and edit the contents of the text box. Use the toolbar on the right to make formatting changes. Make the changes you prefer and then click on the Save button.

Below the text box is a list of your contact fields. Any custom fields that you’ve created will be listed below four default fields: “Preferred format”, “Email”, “First name”, and “Last name”. “Preferred format” allows contacts to choose whether they want to receive plaintext or HTML mailings.

Here are the meanings of the customization options listed across the top of the contact fields:
- Order: These numbers represent the order in which the fields are featured on your form. Simply change the display order for your fields by editing the numbers assigned to each field. (Changing the field order here will overwrite any changes previously made on the Manage Contact Fields page.)
- Display name: This pulls in the names of the contact fields in your account. You can edit contact fields to change the field name, but you also have the option to edit the display name only. For example, you might have a contact field named D.O.B, but for the signup form, you’d prefer to display as “Date of birth” so you would write that into the field in place of D.O.B.
- Field: Shows how this field will look on the form, based on the contact field type selected.
- Require: Select the checkbox for fields you’re including on the form that you want to make mandatory.
- Hide: Select the checkbox for fields you do not want to be included on the form.
Step 3: Groups
To the right of the contact field customization options is a section titled “Add subscribers to”. Click Add or remove groups to choose which group(s), your new signups will be added to. After you make the changes you prefer, click on the Save button.

Note: If you don’t select any groups, new signups will be added to your audience, but they’ll be “in limbo”. This means they could miss out on being sent your emails, so it’s important to choose at least one group here. You can also display groups on your signup form and allow your contacts to choose which mailings they want to receive. Legacy forms cannot display subscriptions, as they pre-date the Subscription Center.
Step 4: Thank You Message
The next tab in the “Signup stages” section is labeled “Thank you message”. This is where you can customize the ‘thank you’ page that subscribers see after submitting the form. You can add an image to this message and edit the text by clicking inside the text area. If you already added an image when customizing the signup form, it will be featured here as well. Uploading a new image will overwrite the first one you uploaded.
You can also redirect subscribers to your own web page by checking the box next to “or redirect signups to another URL” and enter in a URL for that custom page. After you make the changes you prefer, click on the Save button.

Step 5: Confirmation Email
The next tab in the “Signup stages” section is labeled “Confirmation email”. This is where you can customize the plaintext confirmation email that new contacts receive after filling out the form. The default text includes tags that are replaced with text or a link when the email is sent. Here’s what each of those tags does:
| Tag | Description |
|---|---|
| [rsvp_name] | Displays the sender name set up for your account. |
| [optin_confirm_url] | This is the verification link that confirms the contact’s email address and their intent to subscribe. |
| [rsvp_email] | This displays the sender email set up for your account. |
| [manage_prefs] | Converts to a link for the manage preferences form. |
| [opt_out] | Converts to an opt-out link so the recipient can unsubscribe immediately. |
After you make the changes you prefer, click on the Save button.
Step 6: Tracking
The next tab in the “Signup stages” section is labeled “Tracking”. If you use Google Analytics, you can set up tracking for new signups by adding your Google Analytics ID to the field here.
Step 7: Manage Preferences Email
The next tab in the “Signup stages” section is labeled “Manage preferences email”. This section is where you can customize the plaintext email that existing contacts receive after filling out the form to manage their preferences or update their information. Like the confirmation email, the default copy includes tags that are replaced with text or a link when the email is sent. Edit the message as you’d like or uncheck the “Send manage preferences confirmation” checkbox to turn off the email. Then click on the Save button.
Once you’ve confirmed all your changes, click Publish this signup form to see your options for sharing the form. A pop-up window will display your publishing options and all you need to do is follow the prompts.
Frequently Asked Questions About Signup Forms
Which signup form does the Manage Preferences link in my campaign footer lead to?
For all accounts with an active Subscription Center, the Manage Preferences link in your campaign footer leads to your Subscription Center.
For accounts that pre-date the Subscription Center and have not activated it, the Manage Preferences link in your campaign footer will link to your legacy “Your Default Signup Form”. When a recipient clicks the Manage Preferences link, the form copy will automatically be changed to “Update your contact information and email preferences using the options below.”
Which signup form does the “Sign up to receive our future emails” link in my campaign footer lead to?
By default, the “Sign up to receive our future emails” link in your campaign footer leads to your original signup form, usually named “Your Default Signup Form”. However, for each mailing you send there’s an option to select which signup form to link to from the footer of the email.
Why can’t I make my form a Javascript object?
If reCaptcha is enabled for your form, the option to “Use a Javascript object” will not be available. To use Javascript, you will need to turn off reCaptcha.
How can I best center my iframe form?
For iframes, setting the width attribute of your iframe tag to 100% can help with mobile optimization and the centering of the form on desktop.
Can I embed my signup form in a mailing?
No, Javascript and iframes cannot be used within a mailing. Instead, you can link to the form from your mailing.
I made a change to my form, do I need to update my permalink or website code?
No, changes made to your signup form are pushed to it automatically after you click Publish. The link and embed code will remain the same, so no need to worry about updating your links or website code.
Can I make changes to my form’s color or other design elements in the form builder?
No, you cannot. Any changes to form color or other design elements must be made outside of our platform.
Can I duplicate a form?
No, signup forms cannot be duplicated. If you want a copy of a current form, you’ll need to start from scratch.