The drag and drop editor in your account empowers you with a slew of customizable design elements that are controlled by the 3 main functions found in the editor panel under the tabs for content, rows, and settings.
Anytime you click on a content block in an open campaign, you’ll see the content properties appear in the editor panel on the right. Likewise, when you click outside of a content block, you will see the row properties appear in the editor panel on the right.
When clicking on either a row or content block, small icons will appear that you can use to clone, save (row only), or delete it.
Drag and drop editor functions
Content tab
When you open a campaign, the drag and drop editor will auto load in a panel on the right side of the page with the content tab preselected. Here, you’ll find the individual content blocks for Text, Image, Button, Divider, Social, HTML, Video, Icons, and Menu.
Each of the content blocks has its own settings, such as granular control on padding and alignment options. You’ll see that the right-side panel will automatically switch its content to the selected block element for you to adjust and control. Content blocks can be added, removed, copied, and moved.
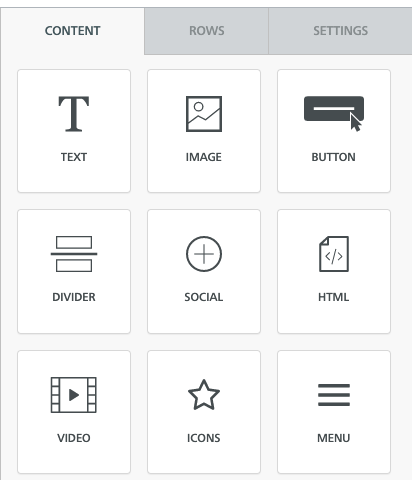
To use them, simply drag a content block from the right side of the campaign, and it will auto-adjust to the column width. Use the Drag it here prompts when moving it into the campaign to determine where to place the content block and drop it as desired.
Rows tab
In the drag and drop editor, rows define the horizontal composition of each section by using columns. Each row has its own properties and can include 1-6 columns, which can be adjusted while creating a campaign. Rows can be added, removed, copied, saved, and moved.
When you click on the rows tab from the right-side panel, you’ll see the parent controls for the rows where you can choose from different layouts to insert into your campaign. Every row has its own settings, and you can also adjust the number of columns in a row when creating a campaign by clicking on the down arrow.

Using more than one column in a row allows you to put different content blocks side by side.
Clicking anywhere outside of the content area of a campaign will bring up the row properties in the editor panel on the right.

Refer to this article for more information on row properties and what you can do with them.
Settings tab
The third tab represents the general settings for the campaign. However, it is important to note that these settings become the general options that will apply to the entire campaign. This means that the font family that has been determined in the settings tab as the default font will then be used everywhere in your campaign, except where you use a custom setting.
Special note about fonts: A font’s ability to render correctly in the inbox is dependent on the device to which it’s sent. If a device that the email is opened on does not have the specified font installed, it will default to a different font that it can render when displaying the email. We always encourage you to test your campaigns before sending them, especially if you decide to alter the default fonts or use a custom setting. And when in doubt, choose email-safe fonts such as Andale Mono, Arial, Arial Black, Arial Narrow, Book Antiqua, Century Gothic, Comic Sans MS, Courier New, Georgia, Helvetica, Impact, Palatino, Tahoma, Times New Roman, Trebuchet MS, and Verdana.
For example, if you selected Arial as your default font in the settings tab, you would see Arial used as the font for any text blocks in the campaign. Refer to this article for more information on the settings tab and how it can be adjusted.

Autosave and using the Undo, Redo & History options
Anytime you are using the drag and drop editor, the campaign content will be autosaved every 60 seconds. This means that changes are always being tracked and you can also revert back to older versions whenever necessary.
When any change is made to an open campaign, look for the small icons that appear in the bottom left corner of the editor. Click on the left arrow to Undo your last action, the right arrow to Redo your last action, or use the History icon to revert to one of your saved iterations.

If you would like to revert to one of the saved iterations of the current campaign you are working on, after clicking on the History icon, you’ll see a list of timestamps and a log about what change was made for each. All you need to do is determine the place you’d like to revert back to and click on the timestamp.
Just be aware that when you go back, the timeline for more recent changes remains available, allowing you to move forward again, without losing any of the edits.
Additional features of the drag & drop editor
Edit in mobile design mode
Our easy to use templates are not only mobile-optimized but also offer a mobile design mode which allows you to switch the view of the drag and drop editor while you are creating or editing a campaign to not only see how it will look on mobile but to continue to build or edit the campaign while in the mobile view. You can also easily select to hide content while in mobile design mode.
Easily personalize your content
When using a text block, you can customize the copy to access any of your content field data so that the message is personalized with their first name, birthday, or many other options.