This article explains how to set up a content split test to test two different mailings against each other.
With content split testing, you can test two different mailings against each other with a portion of your audience. We’ll send the mailing with the highest response to the remaining recipients. It’s a smart and easy-to-use tool that helps you learn what works best for driving up metrics with your audience so that you can always get the best results from your mailings.
This is a great option to use when you want to see if one campaign style or product offering is a better choice than the other because you will get to see what your audience prefers without specifically asking them. You can also choose to just test the subject line if that is the only element you are curious about.
Who Can Create a Content Split Test?
Depending on your account type, certain users may not be able to create content split tests. Users with the Editor, Author, or Response only roles cannot create content split tests. Users with the Parent, Manager, Administrator, or Full roles can create content split tests.
Users must have permission to send campaigns in order to create content split tests. Users who cannot send campaigns also cannot create content split tests.
Creating a Content Split Test
In order to conduct a content A/B split test, you’ll need to create two separate campaign drafts and save them. Once you’ve done that, follow the instructions below.
- Navigate to your Campaigns tab.
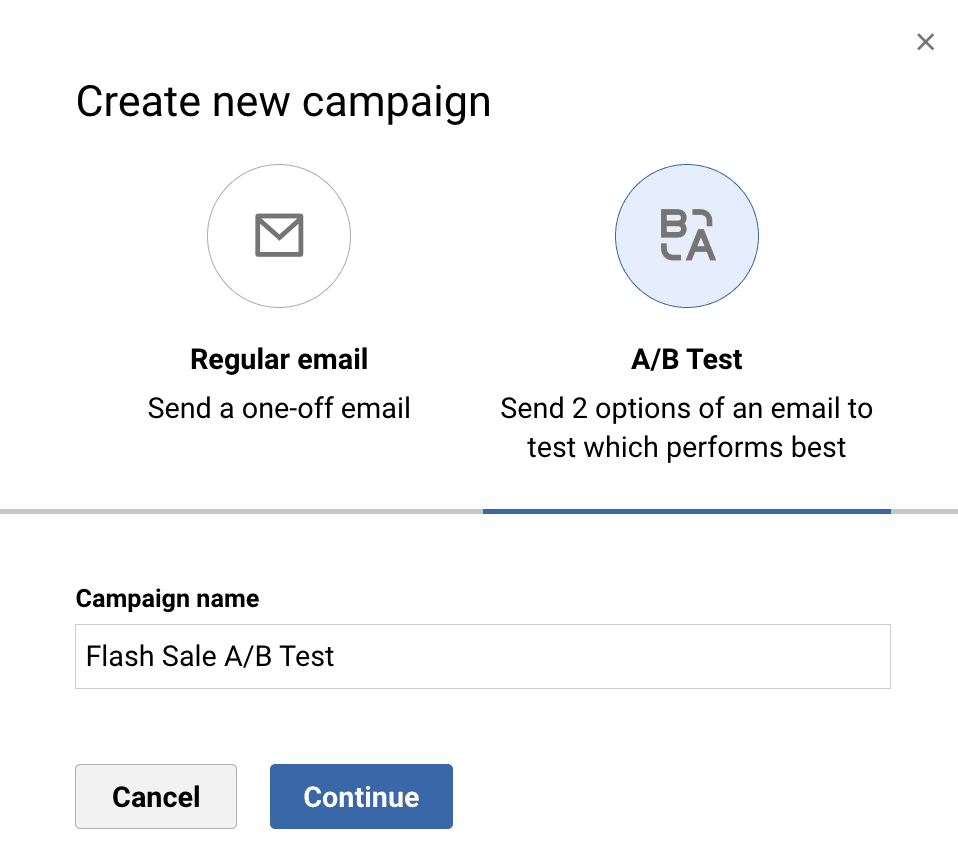
- Click on the Create new campaign button.
- In the pop-up window that appears, click on the A/B test option.
- Give your campaign a name and click on the Continue button.
![]()
- Select your mailings.
- Click on Choose version A to select the first campaign that you want to test.
- Click on Choose version B to select the second campaign that you want to test.
- For each campaign, a pop-up window will appear. Use the fields to enter the subject line, preheader text (optional), sender name, and sender email address.
- Select your test settings:
- Use the “Test group size” dropdown to select the percentage of your audience that you want to be used for the test.
- Use the “How should the winner be chosen?” dropdown to select how the winner should be chosen. The options are:
- Highest click rate on entire mailing
- Most clicks on a link in each mailing (If you select this option, two new fields will appear, allowing you to choose a specific link)
- Highest open rate on entire mailing
- I want to manually choose a winner
- Use the “Send winner after” menu to choose how long you want the test to run.
- Select your send settings:
- Use the “Audience” dropdown to select your audience. There must be at least 30 contacts in the audience you select.
- Check the “Exclude” box to select a segment to exclude from the test.
- Use the “Send test at” dropdowns to select a date and time for the test to send.
- Click on the Review A/B test button.
- In the pop-up window that appears, review your choices. Use the buttons on the top to switch between the preview for Version A and Version B. When you’re satisfied, click on the Confirm & schedule button.

Reading Split Test Response Data
Once the test has begun, you’ll be taken to the Response page. Here you’ll find a summary of the test, including the criteria, send time, time remaining, and audience used. You’ll know that the test is in progress because you’ll see a message in the upper right that says “Test in progress” and shows how much time is remaining.
If needed, click on the Stop test button to cancel the mailing. You will be prompted to confirm this before our system stops the test.
As the test is in progress, the response for each mailing is displayed, but you’ll need to refresh the page each time you want to see updated results.
If you’ve set your test to automatically send out the winning version, it will be sent at the end of the testing period. You can also manually pick a winner at any time by clicking on the Choose as winner button. Once testing is finished, the winner will be clearly indicated.
Frequently Asked Questions About A/B Testing
Which users can create content split tests?
In Plus and Lite accounts, Administrators and Full users can create content split tests. In Essentials accounts, the account Parent, Administrators, and Full users can create content split tests. And in HQ, Teams, and Corporate accounts, the account Parent, Managers, Administrators, and Full users can create content split tests.
What percentage should I use for the test group size?
You must have a minimum of 30 contacts in order to send a split test. This means that you will need to consider the size of the audience that you will be sending the split test to in order to determine the best percentage to send the test to. Our system will distribute your mailing variations to the test group first, then once the winner is chosen, it will be sent out to the remaining contacts in your selected audience. For example, if you’re sending to an audience of 500 contacts and set the test group size to 20%, we’ll test with 100 contacts where 50 will receive Mailing A and 50 will receive Mailing B.
How is the winner chosen?
After our system sends the campaigns to your test group, the remaining members of your selected audience will receive the mailing with the best results. The winner is chosen based on your selection under the “How will the winner be chosen?” field. Here is the breakdown for each option:
- Highest click rate on entire mailing: The mailing with the most overall clicks wins.
- Most clicks on a link in each mailing: The mailing with the most clicks for a specific link wins. If this option is selected, you’ll need to enter the link URL for both Version A and Version B exactly as they appear in your mailing.
- Highest open rate on entire mailing: The mailing that was opened the most wins.
- I want to manually choose a winner: You will need to choose the winner manually after the testing time has ended or you stopped the test by using the “Stop test” button. If you do not choose a winner, your mailing will not be sent to the remaining members of your audience, but you can still view the response data for the mailing.
Can I add Google Analytics to my mailings?
Yes, you can add Google Analytics to the A/B test by checking the “Add Google Analytics” box under “Test settings”. You can choose names for the winning version as well as versions A and B.
Can I use the Compare Mailings tool with the mailings from a content split test?
No, email campaigns from a content split test are not available for use with Compare Mailings.
Why does my winning campaign have fewer opens than the other campaign?
After the winning version has been sent, opens continue to be recorded for the 20% of recipients in the test group. Sometimes this can result in another variation of the subject line outperforming the version that was in the lead when the test period ended.
Can I see my A/B test results on the recent mailing section of my homepage?
Yes, once your A/B test has chosen a winner and sent the winning campaign, the results will appear in your recent mailing section. However, for tiered accounts, the results will not be visible at the parent level, but can still be seen at the subaccount level.
How is the winner chosen if my A/B content split test is 50/50?
In the case of a true tie, the winner is chosen based on the highest unique open rate for the variation at the end of the testing phase. However, response data continues to track for losing variations beyond the end of the testing phase.
Can I select which of my contacts will receive the split test?
No, the test group will be randomly selected to send to 20% of your chosen recipients, or whatever percentage you select to use.
Can I view my split test results on the response summary email?
No, you cannot. This is because split tests are not included in the response summary email that gets sent 24 hours after you send a campaign. However, you can see your results at any time by going to the Response tab.
Can I edit a split test if it’s scheduled to send later?
Yes, you can. Please refer to our instructions for editing a scheduled mailing. Just be aware that canceling a scheduled mailing reverts it to a saved draft, and this will deactivate your split test settings.
Will new contacts that are added after the test has started be sent the campaign?
No. Any contacts added to your recipient groups or segments while the test is in progress will have to be targeted separately.
Additionally, if you have scheduled the split test in advance, any contacts who were added to the groups / segments that make up the audience of the mailing after the mailing was scheduled will not receive it. This is a result of the way split tests are queued for sending and cannot be changed.
I sent a split test to 100% of my audience, but I’ve changed my mind and want to stop the test. Is it better to use the “Stop test” button or to choose a winner?
In this situation, it’s usually better to choose a winner, rather than use the “Stop test” button. By this point, the campaigns have already been sent and cannot be recalled; since you used 100% of the audience for the test portion, there is no one left who has not received one of the two campaigns. Our system will not send the winning campaign to the contacts who received the losing campaign. Each contact will only receive one campaign during a split test, even if you sent your split test to 100% of the audience.
So in this case, the only thing that using the “Stop test” button does is make it harder for you to view the split test response data. If you choose a winner, the split test will be visible in your Response tab and you’ll be able to view the final combined response data, as well as a click map of the winning version. On the other hand, stopping the test cancels the mailing and removes it from your Response page. If you want to see the results, you’ll need to go to the Campaigns > Sent tab and click on one of the two mailings used for the test.